
Hello there! I'm Antonio Ackalin!
A creative and enthusiastic game developer who's been greatly interested in creating video game fun since forever! Ever since creating my first game in 2014, I have acquainted myself with multiple fields within game dev to become a capable and savvy developer.
With my main and strongest profession being programming, I quickly get to create gameplay mechanics and work towards constructing the player's experience, ensuring it's one that is not soon forgotten. Along the way, I use my problem solving ability to solve bugs and faulty design alike. My preferences are to work on tight responsive gameplay and wherever the aesthetics of the game can be expressed the most.
I have amassed plenty of experience of working in projects and am dependable in teamwork with people of other disciplines. During projects I support team morale and pull through difficult situations with humor and optimism. Diligence and high spirits have helped me adapt to wherever I've ended up in and I've got no shortage of high spirits particularly.
I enjoy creating stuff after all, especially with good company and swedish fika!
Game Design & Programming
(2016 – 2019)
Game Programming
(2019 – 2021)
On the smithereens of an Old World, they struggle for supremacy in frantic arena boat-battles.
Joust your way through fierce free-for-all duels and turbulent team battles, and find out who's the toughest Space Pirate around!
Role: Programmer, Level designer
Team size: 7
Engine: Unity C#
Length: 7 Weeks
The second game project from my education in Uppsala University back in 2017. The games each team made were required to use unconventional input devices that could be played on an arcade cabinet. This was later further polished for an itch.io release by 2019.
During its exhibition at Gotland Game Conference 2017 (GGC17), RIM RAM RUM was a player-versus-player arcade game. It was controlled with a ship's wheel for steering, button for dashing and a rope that you pulled for firing cannons at your rival, as demonstrated in the trailer below.
I was mainly in charge of UI functionality, the implementation of main mechanics such as dashing, jumping, cannonball firing and most importantly for GGC17, input methods that suited our unconventional controls.
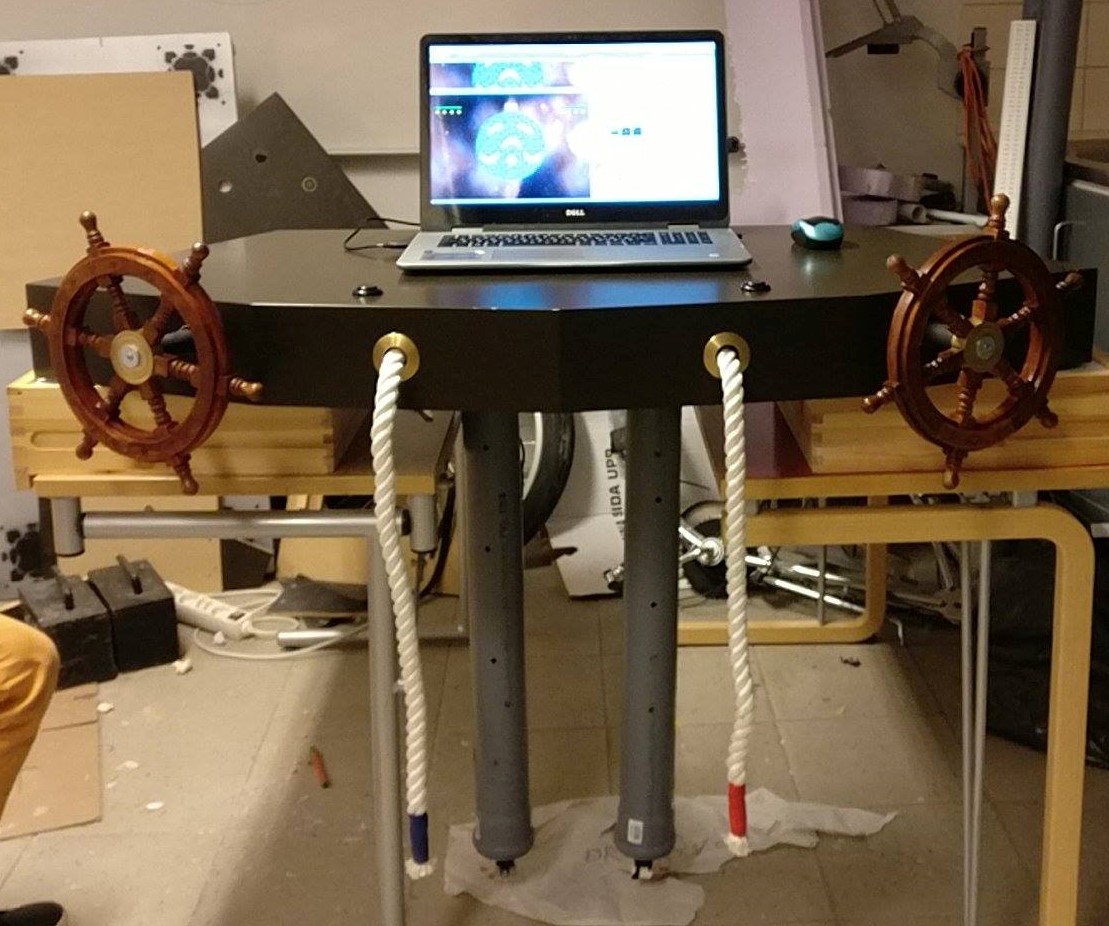
The great concern at that time was how to have the game recognize inputs from multiple mice, since our constructed controls relied on using a mouse for each player to detect which way a wheel was steering towards.
A Unity plug-in called Multi Input made by Raving Bots helped resolve that issue since nearly no other available tools made it possible for the game to distinguish and handle multiple mice devices.

However, the implementation of the new input methods provided by the plug-in library meant that each player needed an input device assigned through code. The game needed to know exactly what input device it should use for each player, instead of assigning any device that it could find. Each steering wheel/mouse device was after all designed to be used by player 1 and 2 respectively.
Multi Input already provides a couple of functions to check if a found device meets certain criterias (such as if the device is a mouse device or not), and by adding another criteria to check which USB port the device was plugged into, we could determine if the found mouse device should be assigned to player 1 (left USB port of the laptop used during exhibition) or player 2 (right USB port).
This automatic assignation of mouse devices successfully worked during the GGC17 exhibition but was later reworked once the project was further worked on for a digital release with support for gamepads.
Upon starting the game, players start in a lobby type of screen where they can join the game by pressing any buttons on the gamepad they want to use. After joining, they can select their ship, team or turn on/off auto-aiming for cannonball firing.
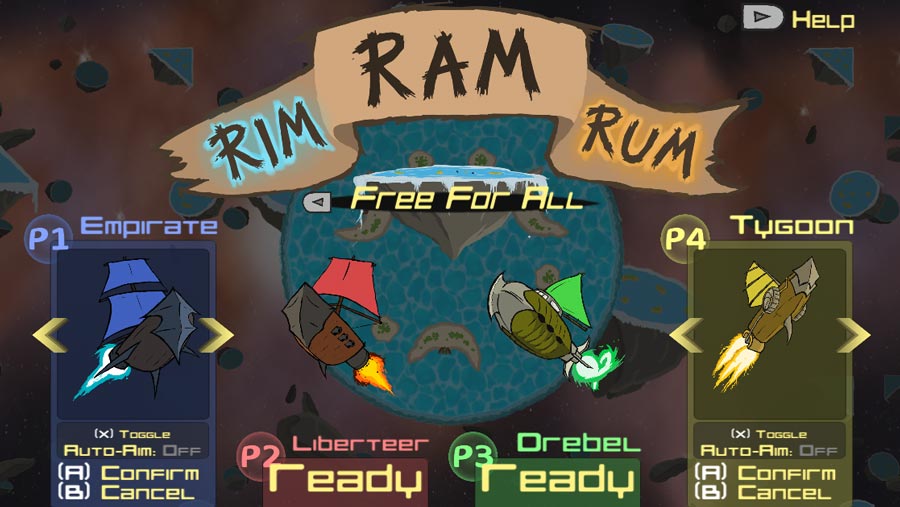
A script called ReadyState.cs keeps track of four instances of the class PlayerSlot, based on the maximum number of players. Each instance has an enum denoting the state of the slot. Either the slot is waiting for a player to press a button to join, selecting a ship or is ready and waiting for other slots to finish selections.
Depending on the selected game mode (Free-for-all, Team battle), either the game can be started once at least 2 player slot instances are ready or if at least 2 teams contain one player.
Team battle can be enabled in the lobby. Depending on the game mode, different conditions have to be fulfilled for a battle to end. The win conditions are described in code below.
Data of all possible teams are stored in an array and consists of the team name, color and number of battles won (which gets displayed in the results screen so winners can brag).
When a team battle starts, the GameDirector.cs script will create the actual teams using the datas as reference. It will look through all players to see if they possess data of a team that isn’t created yet, and will create that team if that is the case.
The teams that are created will hold references to the player ship classes to keep track of what members are part of what teams. A team battle will of course end upon detecting that only 1 team with alive members remains.
Scale the treacherous tower of falling blocks for the ultimate score! It doesn't matter if bats, ghosts or thumping thwomps opposes you, the hammering hermit got to climb to the top!
Role: Programmer, Sound Designer, Musician
Team size: 6
Engine: Unity C#
Length: 2 Weeks
The first game project in my Futuregames education. Teams of only 2D artists and programmers were to create a game with mechanics inspired by different types of classic arcade games. Hammer Hermit is a game with mechanics inspired by Tetris and Ice Climbers.
During this project I mainly worked on the platforming of the player character, handled game states, implemented an almost cancelled co-op mode, as well as producing sound effects and music.
Since I was going to work on a platforming game that needed tight controls and precise collisions, I decided from the beginning to never use any physics at all for the movement of the player character - It was out of the question. I had to experiment doing my own player collision checks that were more accurate, something that needed work well with the moving tetris blocks.
The tetris blocks themselves don't actually have colliders. Whenever a falling tetromino moves, a script called Matrix.cs uses the locations of all tetris blocks to enable tiles on a separate tilemap gameobject, which are only invisible tiles with colliders. I must stress that I was not in charge of any of the tetris parts, but I find this necessary to mention regardless.
With a whole tilemap that represented the terrain of the entire tetris field, I could check the player’s collision against the terrain using raytrace colliders. I only utilized raytrace colliders against the terrain and used simple box colliders against anything else such as enemies and coins. To ensure I covered all corners of the players boundaries, I cast 3 rays on all four sides of the player, one that was cast from the center of a side and the other two being cast on each respective extreme edge of the side. It wasn’t necessary at first to check for collisions against walls behind the player, only against walls in front of the player since the player cannot move backwards. The introduction of conveyor belts changed that however, since they can move the player to any horizontal direction regardless which one the player is facing.
The raycast distance had to be very short since they were meant to snap a player to the position where a ray hit the terrain. However, once the player moved, the distances had to be slightly increased in case the raycasts moved past the terrain colliders between frames - that would be a situation where the player could just move or fall through terrain because the raycasts are just too short!
Hammer Hermit was initially intended as an asymmetrical co-op game where the 2nd player controlled the falling tetrominos while it was up to the 1st player to do the platforming.
Creating this mode wasn't particularly hard but it was done by the end of production as it was simpler to have all available actions to the player implemented first in single player mode - because then it was just a matter of checking where the game should look for inputs for the actions. The rules didn't need to change in co-op so the losing conditions of the core gameplay remained the same - it was just about handling inputs in slightly different ways. Mainly. Kind of.
A class called IndividualInput has two instances located in both the class that handles actions of the player character and the tetromino respectively. The IndividualInput class contains references of names from a set of input axes that matches its configured controller option. Input axes are features in Unity that basically takes two inputs and turns them into values that are easy to use in code.
These input axes have been set up in the input manager of the project. They all have a name convention that goes "X Horizontal" or "X A", where X is a controller option (1, 2, 3 etc.) and the rest describes what inputs they get. Hammer Hermit has 4 controller options. When the player starts the game by either clicking on '1 Player' or '2 Player' in the start screen, a function gets called in each instance of IndividualInput which sets the controller options to one of four options. That means the instances will now update and check for inputs from a new set of axes than before, since the name references also uses the same naming convention as the ones in inputmanager. The player character's controls don't change as much as the tetris. In 2 player mode, the tetris inputs are now literally checked on a gamepad instead of a keyboard, as in single player mode.
The tedious part about this was replacing all code where I use Unity's Input class, with IndividualInput's input check functions, in every nook and cranny. I'm glad that this part doesn't need more explaining than that.
Join Elizabeth in her adventure through personal nightmares to find her missing doll. Discover the truth of the night before the shadow monster discovers you...
Role: Programmer, Sound Designer, Musician, Writer
Team size: 10
Engine: Unity C#
Length: 7 Weeks
The third game project of Futuregames, where the game had to evoke a certain theme of our choice. Transient came to evoke suspiciousness in the player. With a large team and scope, Transient became one of the most extensive projects I’ve been part of as of yet.
During the project I was in charge of the sounds and music as well as implementation of it. I fine-tuned movement, camera obstruction, interactable detection and UI.
The music system in Transient was designed and implemented by me, I took it as an opportunity to exercise bringing forth the mood and atmosphere in music in such a dynamic way that can only be done in video games, while also utilizing the system to provide audible feedback to the player’s stealth condition.
Once the player is within hearing range of the monster, the somber piano tune fades into a haunting ambience. Additionally, a beat will start playing as soon as the monster hears the player and closes in to investigate the sound - this beat is heard more clear the closer the monster gets. If the monster sees the player and gives chase, all music will fade away so a drumming chase music can play. Once the monster has lost track of the player, a drumstick version of the chase music quietly plays while fading out over a short duration. If the monster finds the player once again before the drumsticks have completely faded away, a shorter opening of the chase music starts, signaling that the chase is on again.
How was this achieved through code?
The MusicManager class keeps track of what track will be playing, using enum states, of which there are Safe, Peril, Chased and Grabbed. The safe piano music and haunting ambience is always playing but fades back and forth to each other when transitioning between the Safe and Peril states.
The GameManager class reads what behavior the monster is doing and uses that to change states in MusicManager accordingly. Once the monster successfully catches the player for instance, the GameManager tells the MusicManager to switch into the Grabbed state where it will in turn fade away all types of music sources.
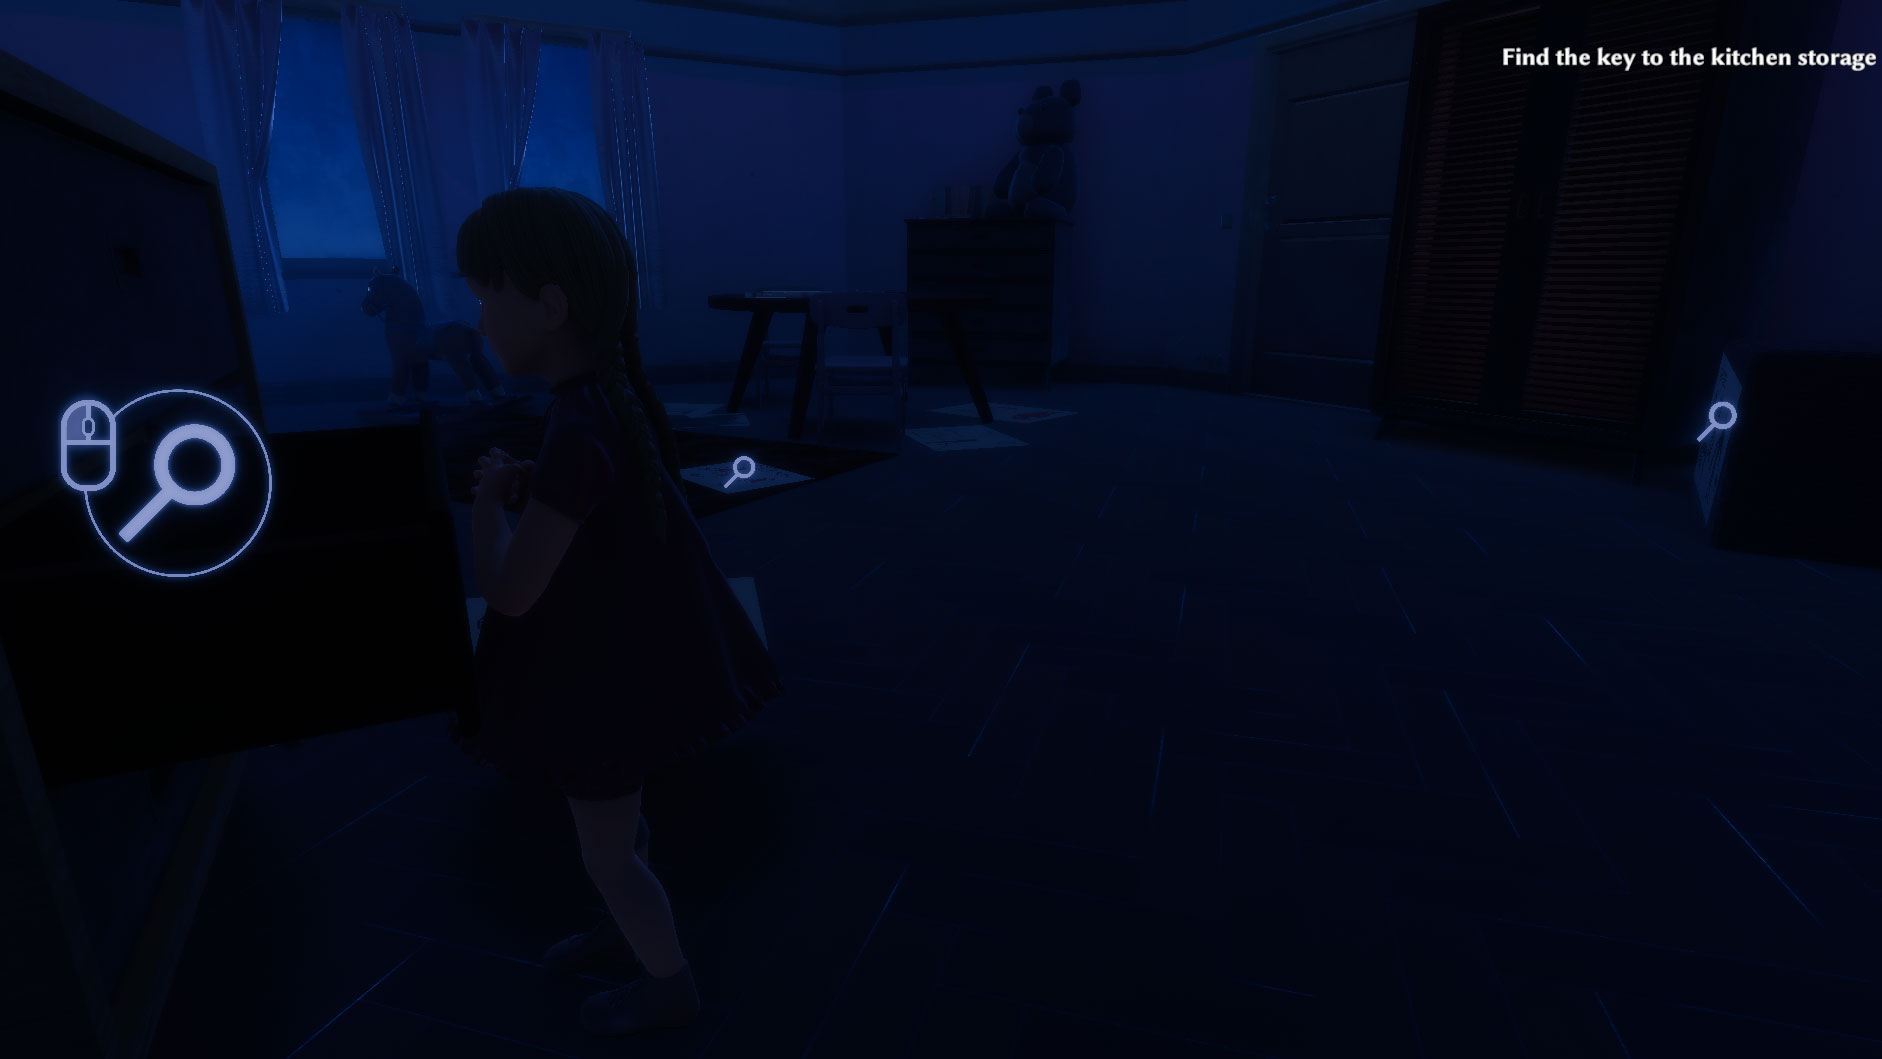
Throughout the game, the player can interact with various objects in the dark house to perform actions such as open drawers, hide in cupboards, view drawings and pick up items. A programmer in my team scripted the interface called IInteractable which implements usable functions for interacting with objects and when nearing or leaving them.
I took upon the task of perfecting the way the player detects interactable objects since the player could be surrounded by interactables and needed precise interactions. First I researched third person horror games like the Resident Evil 2 remake and The Evil Within to deconstruct their interaction systems. The conclusion I came to was to add two types of collisions that helps the player character detect interactables.
The first was a spherecast fired towards the direction the camera was facing. The spherecast would only hit anything in the interactable layer, so uninteresting things such as walls or furniture wouldn’t block the spherecast. With the spherecast, the player can aim towards the things they want to interact with.
However, realizing that it would be annoying to have to look at everything before interacting, especially on the run from the shadow monster, another collision was added.
The other collider is a capsule collider component that detects interactables in close proximity around the player. If the spherecast doesn’t find any interactables, then the player can still interact with objects that are close enough to them.
An extra linecast is fired between the positions of the player and the interactable object to confirm that nothing is blocking the player from reaching the interactable.
As I researched interaction systems in third person horror games, I noticed a general design on the UI of the interactables. After the team's approval, I went down to implement an UI system based on the horror games.
A prefab called Interaction UI is placed as a child gameobject in all interactable gameobjects. The prefab holds two separate images on a canvas component that renders them in the world.
The first image is a button prompt, indicating that the object will be interacted with once the Interact button is pressed. Only one interactable will show the other image at a time, since the player cannot interact with multiple interactables at once. The prompt icon appears of course when the player faces the interactable.
The other image is an icon representing the type of action that will be performed once interaction happens.
An interaction UI prefab will know when to show its interaction icon once the player has collided with its sphere collider component. This collider component can be adjusted separately for each prefab instance to be larger, smaller or offset towards somewhere. It was left up to designers to fine-tune how. Of course, once leaving the sphere collider, the interaction icon will disappear. They work very well to inform players when they are near something interactable as well as what type of interactable it is.
The interactable will invoke events to call the correct functions in InteractionUI once the player interacts with it in different ways (facing the object, leaving it, interacting).
Worlds have collided, but by whom... or what?
Enter the Maelstrom of Spacetime... Welcome to the Ambiverse!
Role: Programmer, Designer
Team size: 2
Engine: Unity C#
Length: 5 Weeks
For a 5 weeks long assignment during second year in Uppsala University, Ambiverse was conceptualised out of love for JRPG games. This was a tough but learnful experience. As the sole programmer, I created a variety of systems to bridge the gap between design and code.
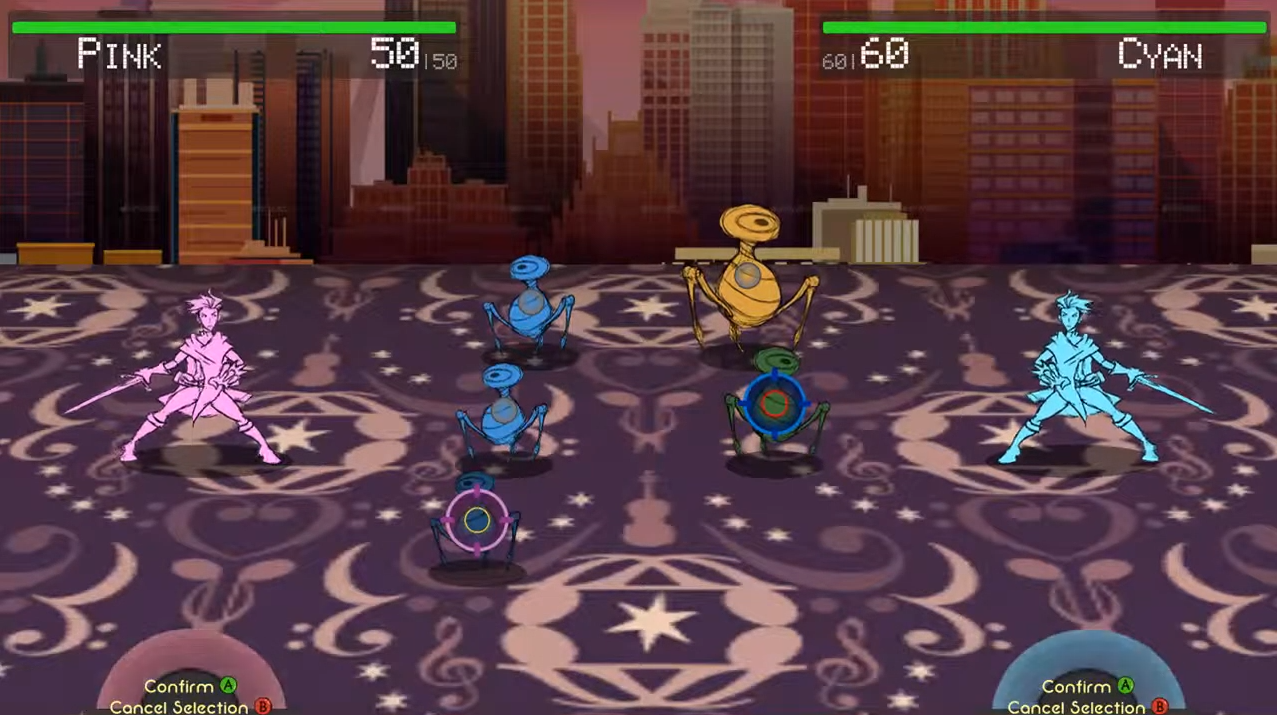
A script called BattleDirector.cs, manages a battle once the player initiates it by touching a mob in the level. Each player character and enemy are positioned on the locations marked on the picture below.
All characters charge up a gauge and once 100% filled, they get put in a list that I call the act queue. The higher a character’s speed stat is, the less they get to wait. The battle director ensures the first one in the act queue gets to act first by looking at the first element in the queue. Once the character has finished acting, they get removed from the list and the battle director will look at the new character that is first in the queue, if there’s any left in it.
If any characters that are waiting in the act queue have their selected targets destroyed then the battle director will randomly select a new one for them.
Player characters that have filled their wait gauge, need to select what type of action to do before being put in the act queue. Actions can be attacking or using an item, though the latter is still not a feature.
For characters that are first in the act queue, a coroutine function will fire off from another script dedicated to different types of actions - ActionHandler.cs.
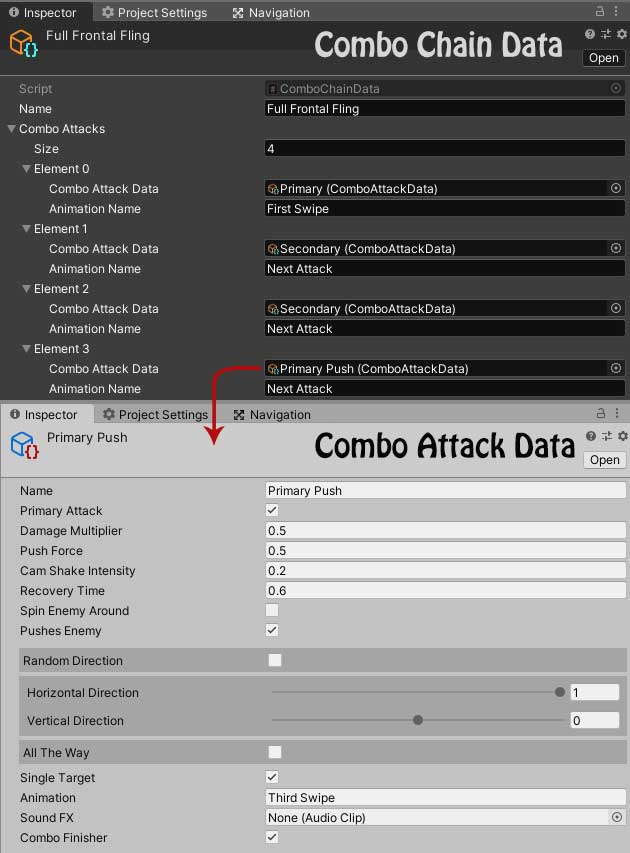
Ambiverse is an RPG that features a combo system. It’s sort of inspired by 3D character action games such as Bayonetta and Devil May Cry rather than 2D fighting games. When attacking an enemy in battle, the player can input combinations of two attack buttons to chain together a combo for higher damage or to attack several enemies at once.
Which combo is performed and what it actually does depends on the information of scriptableobject classes ComboChainData and ComboAttackData. These are stored assets of which new instances can easily be created and edited right in the editor. It’s important however that a ComboChainData is given an unique sequence of ComboAttackData objects. The code can handle duplicate combos but there’s no reason for duplicate combos.
When the player presses one of the attack buttons, a function named GetComboAttack() will be called which will try to get a ComboAttackData depending on what sort of attack button was pressed.
The entire attack sequence is handled within one coroutine, which is like a function that is able to run its code over several frames. Once data of a combo attack is retrieved, the ActionHandler script uses it to apply various effects to the targets (launch target away, spin it around, attack multiple targets).
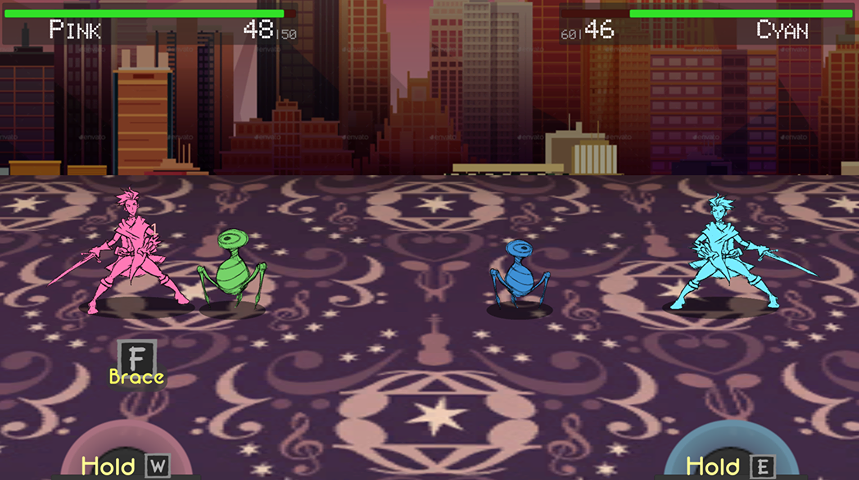
Twirling the level around is the main mechanic of the game, flipping the layout vertically. It adds a new dimension to the platforming and it’s how the player can avoid harder enemy mobs.
As shown, not only is the level flipped upside down, it also changes its looks. New colors are shown. Mobs get replaced by shadows. What’s happening behind the scenes?
To begin with, the whole level doesn’t actually get flipped around. It’s made to appear so by manipulating cameras and gravities. Two cameras are being switched between. Once the player twirls the world, the first camera gets inactivated and the other one activates. In order to gain a smooth fade transition, both cameras render to their own target textures which get displayed onto the screen as raw images in the canvas UI. The opacities of the raw images slides down and up from zero to gain the fade transition. The distortion effect is achieved by changing variables of a twirl effect shader from ImageEffects which is part of Unity Standard Assets.
Graphics of the level doesn’t actually swap to new graphics, it’s all already there. There is already a graphic of a shadowed mob in the upside down. It’s just that the two cameras culls away different layers. The upside down camera culls the game objects that are in the normal world layer and vice versa.
On the programming side, the gravity of the player is simply being inverted and the direction faced is also flipped around so the player is still facing the same direction on the screen.
Yes, working on this feature was tough and confusing.
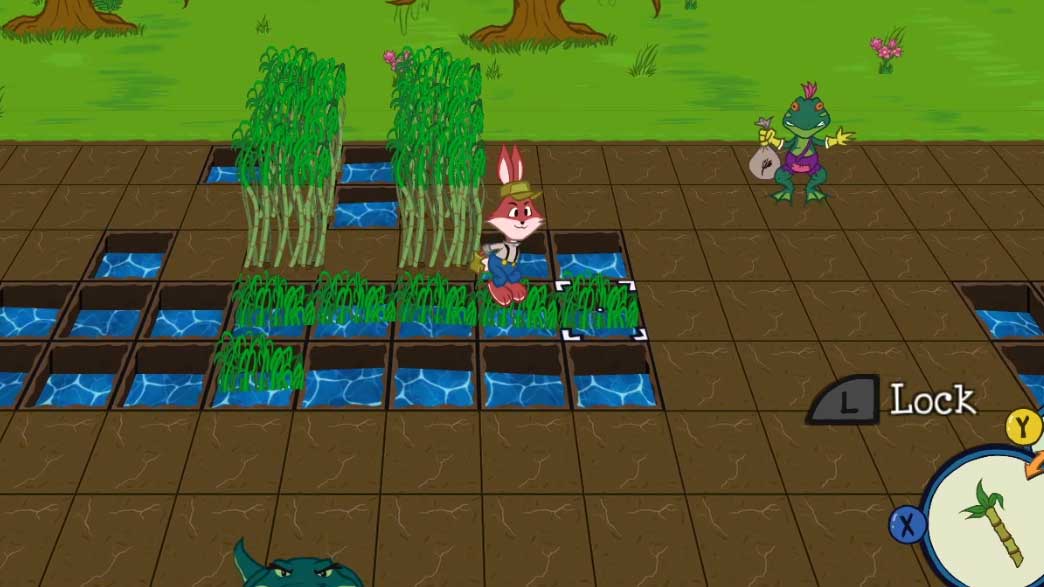
The Grodes next door have been at it again! Alter the level with your fast-growing crops to reclaim your special fertilizers and outsmart Harvey's thieving neighbors!
Role: Programmer, Designer, Musician
Team size: 5
Engine: Unity C#
Length: 7 Weeks
The second big game project of Uppsala University. Agraria was a project made to be a modern grid-based action maze game. A lot of programming was focused on AI, pathfinding and level alteration, all the while maintaining a level editor for quick level design prototyping.
A lot of programming was done overall. This project contains some of my earlier code written in Unity, so coding standards vary.
Altering the layout of a grid-based level was the idea that instigated the project. Thus, growing crops to sprout vegetation walls became the main mechanic of the game and it was the primary tool the player used to trap the agile thieves and catch them.
All entities in the game (player, enemies, crops, pickups) inherits a common class which bestows them references to the grid, current tile and coordination. The player’s ability is to spawn crop entities placed on the tile in front of them.
The ability of crops is to spawn further crops towards a direction. The crop planted by the player gains their direction so they know where to sprout vegetations to. The planted crop passes the info of the direction to the newly sprouted crops in turn so they know where to spread further towards.
Crops have a lifetime before they wither and disappear from their tiles. During their lifetime, they grow through different states:
Once grown enough, crops control the properties on their tile that determine how they are traversable. A sugarcane crop can make watertiles traversable but land tiles impassable for instance.
All enemy AIs use Dijkstra’s algorithm to find a path to their target positions on the grid. The Grode Thief is no exception. There are a set of positions on every level which the thief will run to once the player comes too close.
The AI decides which position to go to by calculating and comparing angles between the positions of itself, the player and the point. The largest total angle means it's a point that will lead the thief towards the closest opposite direction to the player as possible. This causes the thief to never try to run past the player and maintains a large distance.
Sometimes, once cornered, the thief will have no choice but to run around the player. The thief will even diverge from its path in order to keep as much distance from the player as possible.
This is achieved by creating something I introduced to the team as the ‘heat system’. The player generates heat around themselves that spreads out on surrounding tiles. When enemies calculate a path, they take the cost of entering a tile into consideration. What the heat does is granting additional cost to the tile, which only the thief will watch out for.
Since the thief wants to find the shortest route with least cost, they will especially avoid the player as much as possible.
The Agraria unity project has a developer tool which facilitates editing and creating new levels for playtesting and prototyping. It’s a separate unity scene where the user can place obstacles, enemies and pickups onto an empty grid of which dimensions are also adjustable. Below is a video demonstration of me using it and its various features.
It works by selecting a component on the bars of each side of the screen and then clicking on a tile to place it there. Clicking on a tile where a component of the same type already is, will remove it instead. Right-clicking on a component that is a fence obstacle or an enemy will bring up specific options, such as rotation of the obstacle or positions of where enemies will walk from and to.
Each tile on the grid can detect a mouse click with pointer event data interfaces, provided by the Unity engine. A class stores what sort of current component the user has selected and creates an instance of it which gets positioned on to the tile that has been clicked on. Each tile can also detect if the mouse pointer has started hovering over them with the left mouse already held down. When they detect this, instances of the selected component will also be added to them. That’s how obstacles and even enemies can quickly be added to any tile the mouse pointer ‘touches’. It’s like drawing on them with components!
A level can be saved in the menu and stored into the Asset folders as a ScriptableObject - An unity object that is used to contain data. Information such as grid width and height, name of level, enemies and their movement patterns, position of obstacles. This is done through code with Unity Editor features, where a new instance of a ScriptableObject class, called LevelData, is created and the information that the grid of the level editor has, is passed into the level data. Then when data is ready, an asset path becomes generated and the new asset is put there.
Upon playing the level, the code will read data from this ScriptableObject asset and create a new grid out of it, which will be the one the player walks around in.
Be the fastest to build your car, and race down the winding mountain road.
Steal parts, boost ahead of everyone - All in favor of becoming the next Junkhill Champion!
Role: Programmer
Team size: 13
Engine: Unreal Engine 4
Length: 4 Weeks
The second project in Futuregames, with a length of 4 weeks. A requirement was to create a game out of two sports, and so Junkhill Drifters was combined out of speed building and soapbox racing. This was my first real project within UE4 and I coded the foundation of the game in C++.
Considering the fact that Junkhill Drifters consisted of two phases with differing gameplays, I thought it was urgent to establish a sort of a state machine in the code early on. This state machine needed to work so that you could start the game in any state you wanted, so that designers could jump straight into the building or racing part of the game for playtesting purposes.
The C++ classes that managed the states were MyGameModeBase and MyGameStateBase. Yes, names weren’t my strong suit as I tried to understand what roles game modes and states tried to fulfill in Unreal Engine, let alone how to work with them.
MyGameModeBase instantiates the set amount of max player characters and race cars, positions them using the locations of Playerstart and TargetPoint actors placed in the world respectively.
Player characters and racecars are the two types of pawn that a player can possess and depending on if the game switches to the building or race state, characters or race cars will become hidden and the playercontroller will possess the other type of pawn instead.
To demonstrate: As shown in the code within the MyGAmemodeState tab above, OnCarReady() calls on the SwitchGameState function once all vehicles in the building phase have been built. All the possible states are shown below as an overview of them.
In OnCarReady(), the next state will be RaceTransition. In the transition states, players wait to gain control of their pawns until a countdown has reached zero.
The function ends by calling on an event implemented into the MyGameStateBase Blueprint, which is mostly utilized for showing and removing UI Widgets.
The racing track consists of two splines: The camera spline (green) and the player spline (purple). In the racing state, the camera follows the leading player along the camera spline.

If the other racers don't keep up, they end up offscreen and thus lose a life. As long as players have lives left, they will respawn once the leading racer has reached a checkpoint.
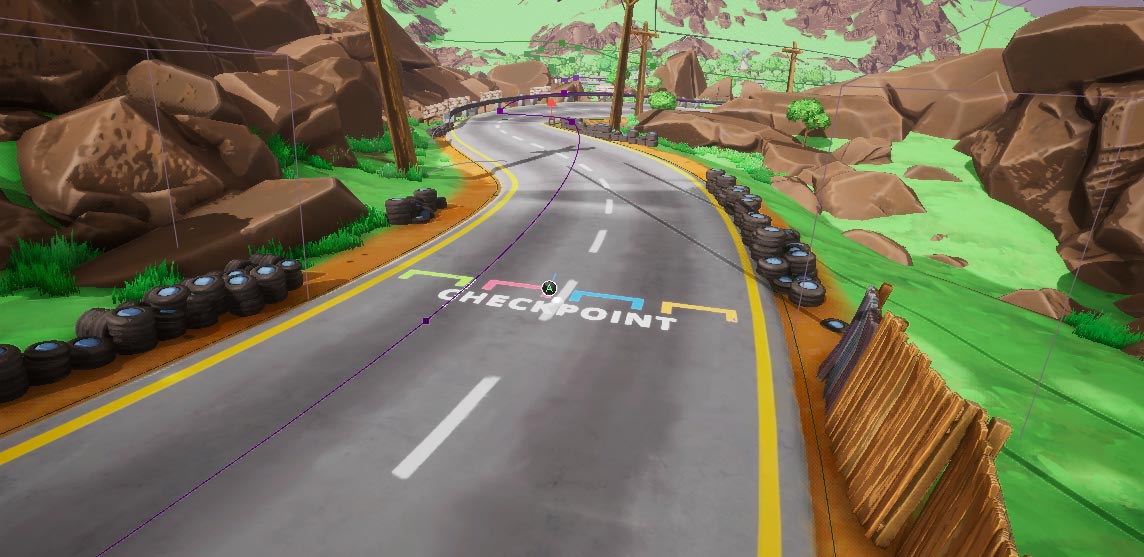
I was not in charge of the sublevel blueprint for the camera, but I can explain that it calculates which racer is in the lead and uses that racers location to determine the closest point in the player spline. Within the camera blueprint itself (which I also wasn't in charge of), the current point in the player spline is used to determine the closest point in the camera spline.
This is important to tell because I use the splines to determine which checkpoint eliminated players should respawn in, while making it easy for designers to place checkpoints around the level where they see fit. The small A button in the picture above is a visual indication of a checkpoint actor. It can be dragged around the racetrack and upon starting the game, the closest point to it in the player spline (purple line to the left of it) will be determined and stored in an array of checkpoint spline points like in the picture below.

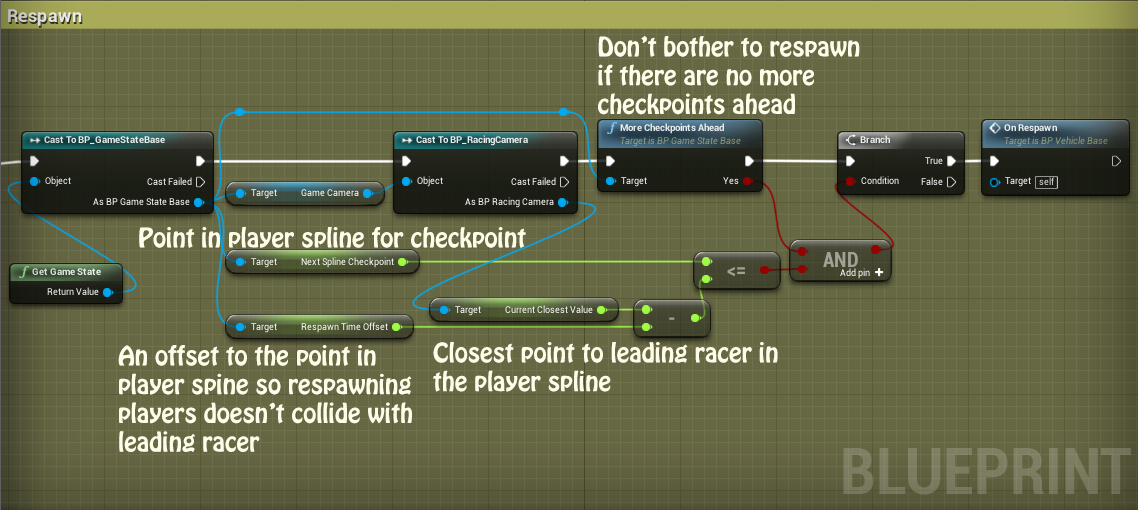
During the race, the next checkpoint location where players will respawn is determined in the blueprint below.
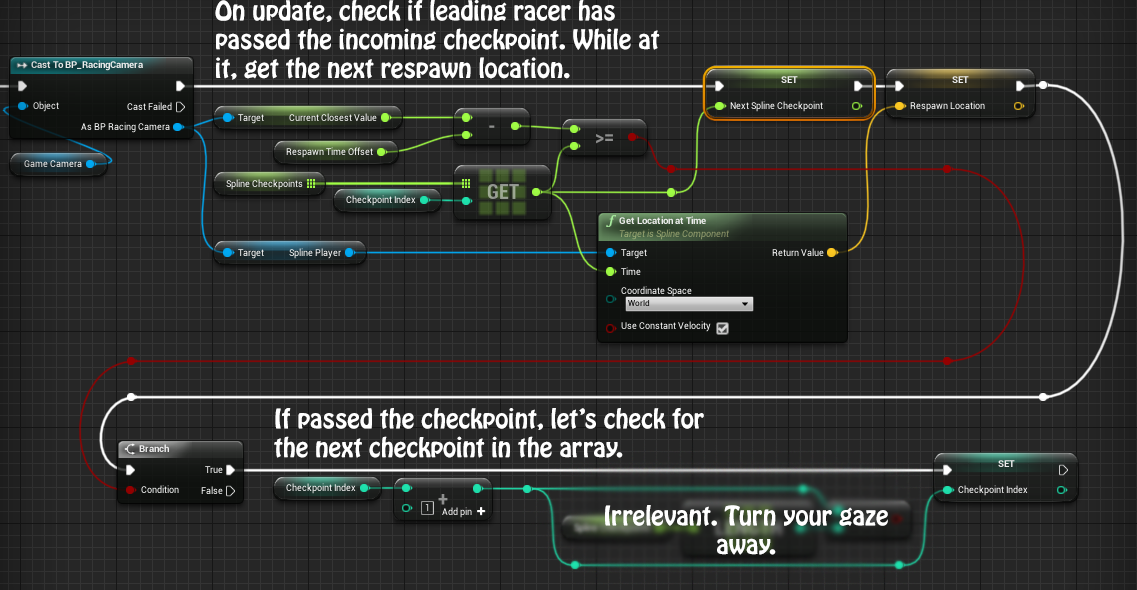
Then, once eliminated racers detect that the checkpoint has been passed, they respawn back in the racetrack, using the stored spawn location that was determined earlier.